Sensor node IMU
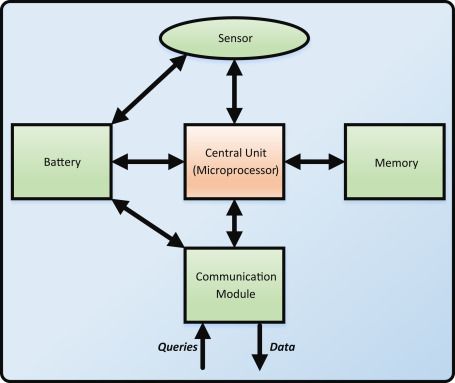
The main components of a sensor node are a microcontroller, transceiver/Communication Module, memory, power source and one or more sensors.
Sensor node example using IMU sensors
A basic IMU (Intertial Measurement Unit) generally provides raw sensor data, whereas an AHRS takes this data one step further, converting it into heading or direction in degrees, converting the raw altitude data into standard units like feet or meters, etc.
|
AHRS (Attitude and Heading Reference System)
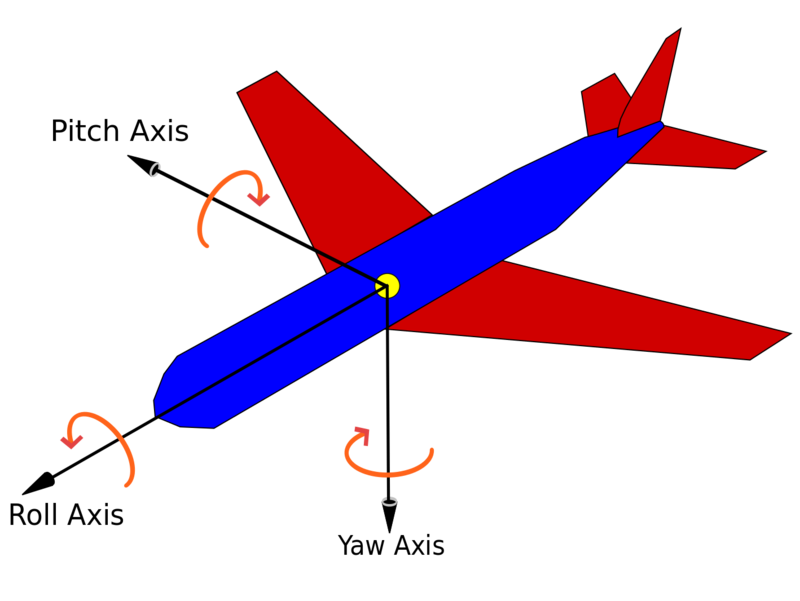
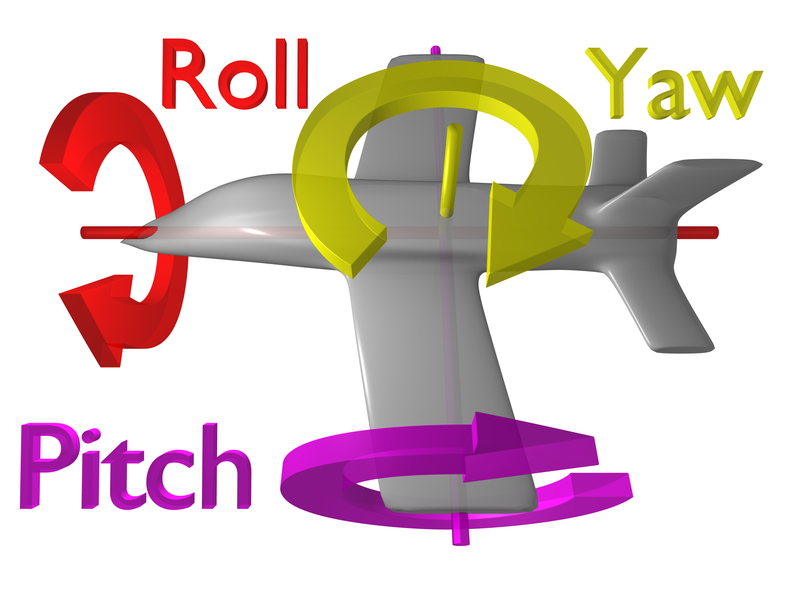
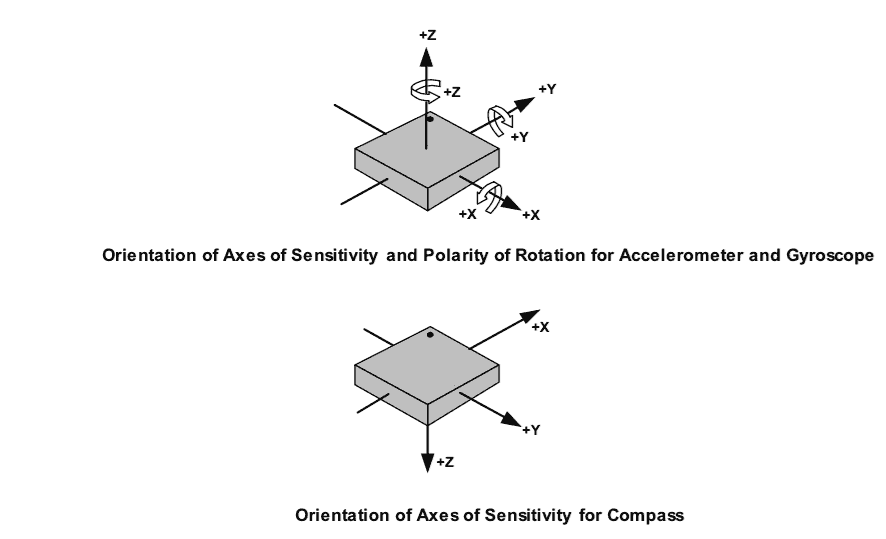
An attitude and heading reference system (AHRS) consists of sensors on three axes that provide attitude information for aircraft, including roll, pitch and yaw. These are sometimes referred to as MARG (Magnetic, Angular Rate, and Gravity) sensors and consist of either solid-state or microelectromechanical systems (MEMS) gyroscopes, accelerometers and magnetometers. They are designed to replace traditional mechanical gyroscopic flight instruments. |
IMU
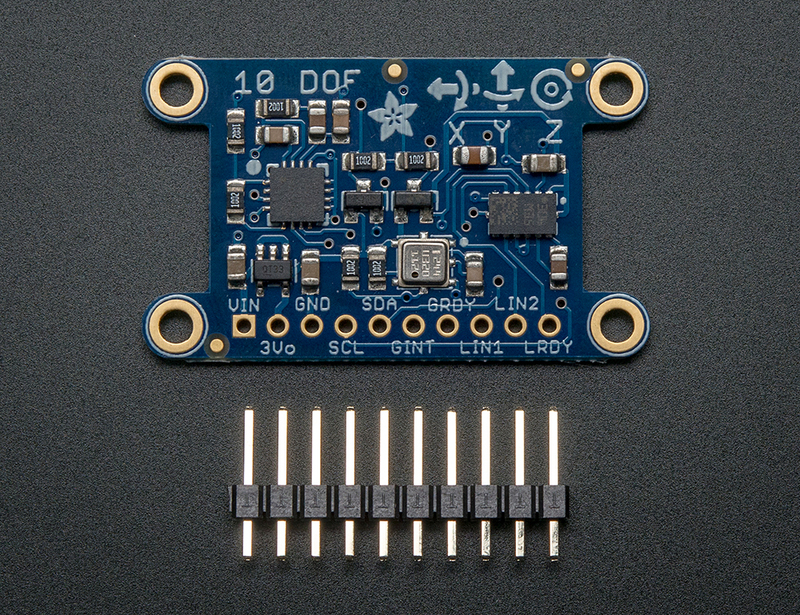
Adafruit’s 10DOF (10 Degrees of Freedom) breakout board allows you to capture ten distinct types of motion or orientation related data.
-
LSM303DLHC - a 3-axis accelerometer (up to +/-16g) and a 3-axis magnetometer (up to +/-8.1 gauss) on a single die
-
L3GD20 - a 3-axis gyroscope (up to +/-2000 dps)
-
BMP180 - A barometric pressure sensor (300..1100 hPa) that can be used to calculate altitude, with an additional on-board temperature sensor
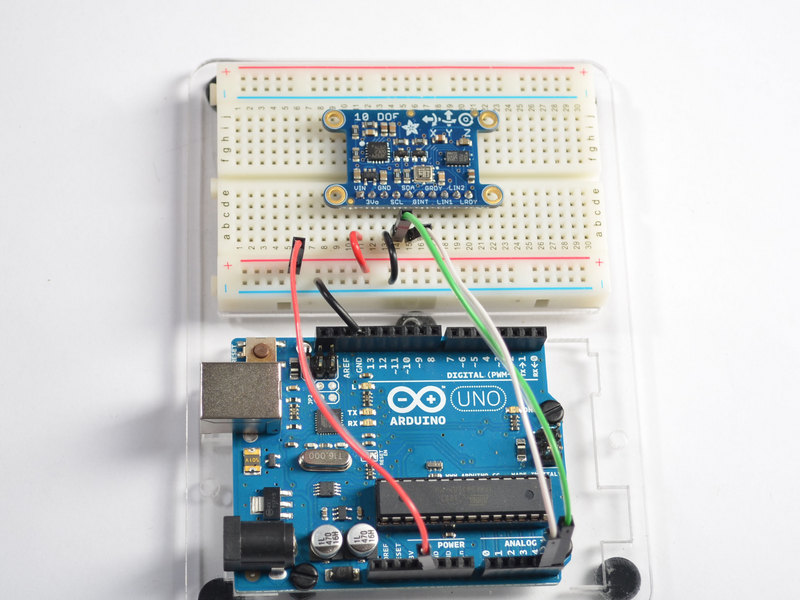
Connecting It Up
Basic Setup
-
Connect the SCL pin on the breakout to the SCL pin on your Arduino. On an UNO & '328 based Arduino, this is also known as A5
-
Connect the SDA pin on the breakout to the SDA pin on your Arduino. On an UNO & '328 based Arduino, this is also known as A4
-
Connect the VIN pin on the breakout to 3.3V or 5V on your Uno (5V is preferred but if you have a 3V logic Arduino 3V is best)
-
Connect the GND pin on the breakout to the GND pin on your Uno
That’s it! With those four wires, you should be able to talk to any of the I2C chips on the board and run any of the example sketches.
Advanced Setup
-
GINT - The interrupt pin on the L3GD20 gyroscope
-
GRDY - The 'ready' pin on the L3GD20 gyroscope
-
LIN1 - Interrupt pin 1 on the LSM303DLHC
-
LIN2 - Interrupt pin 2 on the LSM303DLHC
-
LRDY - The ready pin on the LSM303DLHC
These pins are all outputs from the 10-DOF breakout and are all 3.3V logic
Downloading Libraries
Place the files in the Arduino Sketch Folder '/libraries' sub-folder. You should end up with a structure like this:
-
arduinosketches/libraries/Adafruit_10DOF
-
arduinosketches/libraries/Adafruit_BMP085
-
arduinosketches/libraries/Adafruit_L3GD20_U
-
arduinosketches/libraries/Adafruit_LSM303DLHC
-
arduinosketches/libraries/Adafruit_Sensor
|
Arduino libraries
Arduino libraries are a convenient way to share code such as device drivers or commonly used utility functions. How to install Arduino libraries |
Example Sketch
pitch & roll
sensors_event_t accel_event;
sensors_vec_t   orientation;

/* Calculate pitch and roll from the raw accelerometer data */
accel.getEvent(&accel_event);
if (dof.accelGetOrientation(&accel_event, &orientation))
{
  /* 'orientation' should have valid .roll and .pitch fields */
  Serial.print(F("Roll: "));
  Serial.print(orientation.roll);
  Serial.print(F("; "));
  Serial.print(F("Pitch: "));
  Serial.print(orientation.pitch);
  Serial.print(F("; "));
}
Arguments
-
event: The sensors_event_t variable containing the data from the accelerometer
-
orientation: The sensors_vec_t object that will have its .pitch and .roll fields populated
Returns
-
true if the operation was successful,
-
false if there was an error
A real AHRS system
Loading the AHRS Sketch
#include <Wire.h>
#include <Adafruit_Sensor.h>
#include <Adafruit_LSM303_U.h>
#include <Adafruit_BMP085_U.h>
#include <Adafruit_Simple_AHRS.h>

// Create sensor instances.
Adafruit_LSM303_Accel_Unified accel(30301);
Adafruit_LSM303_Mag_Unified   mag(30302);
Adafruit_BMP085_Unified       bmp(18001);

// Create simple AHRS algorithm using the above sensors.
Adafruit_Simple_AHRS          ahrs(&accel, &mag);

// Update this with the correct SLP for accurate altitude measurements
float seaLevelPressure = SENSORS_PRESSURE_SEALEVELHPA;

void setup()
{
  Serial.begin(115200);
  Serial.println(F("Adafruit 10 DOF Board AHRS Example")); Serial.println("");

  // Initialize the sensors.
  accel.begin();
  mag.begin();
  bmp.begin();
}

void loop(void)
{
  sensors_vec_t   orientation;

  // Use the simple AHRS function to get the current orientation.
  if (ahrs.getOrientation(&orientation))
  {
    /* 'orientation' should have valid .roll and .pitch fields */
    Serial.print(F("Orientation: "));
    Serial.print(orientation.roll);
    Serial.print(F(" "));
    Serial.print(orientation.pitch);
    Serial.print(F(" "));
    Serial.print(orientation.heading);
    Serial.println(F(""));
  }

  // Calculate the altitude using the barometric pressure sensor
  sensors_event_t bmp_event;
  bmp.getEvent(&bmp_event);
  if (bmp_event.pressure)
  {
    /* Get ambient temperature in C */
    float temperature;
    bmp.getTemperature(&temperature);
    /* Convert atmospheric pressure, SLP and temp to altitude */
    Serial.print(F("Alt: "));
    Serial.print(bmp.pressureToAltitude(seaLevelPressure,
                                        bmp_event.pressure,
                                        temperature));
    Serial.println(F(""));
    /* Display the temperature */
    Serial.print(F("Temp: "));
    Serial.print(temperature);
    Serial.println(F(""));
  }

  delay(500);
}
compile
-
Compile the sketch,
-
open up the Serial Monitor (Tools > Serial Monitor),
-
set the baud rate to 115200
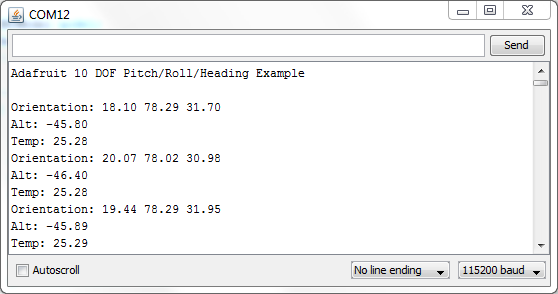
This raw data shows the main orientation data, consisting of 'roll', 'pitch' and 'heading' (or 'yaw) in degrees, followed by the current altitude and temperature
Using AHRS Data
The AHRS sketchs reads raw data from the board’s accelerometer/magnetometer and converts the raw data into easy to understand Euler angles.
In this case, we can see that the roll is about 18°, the pitch is about 78° and the heading or yaw is about 32°, and the sketch will keep updating itself with the latest values at whatever speed we’ve set in the sketch.
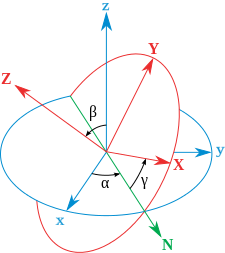
Figure 3. Euler angles, one of the possible ways to describe an orientation
The first attempt to represent an orientation is attributed to Leonhard Euler. He imagined three reference frames that could rotate one around the other, and realized that by starting with a fixed reference frame and performing three rotations, he could get any other reference frame in the space (using two rotations to fix the vertical axis and other to fix the other two axes). The values of these three rotations are called Euler angles. 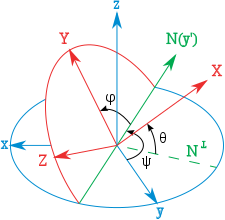
Figure 4. Tait–Bryan angles, another way to describe orientation
These are three angles, also known as yaw, pitch and roll, Navigation angles and Cardan angles. Mathematically they constitute a set of six possibilities inside the twelve possible sets of Euler angles, the ordering being the one best used for describing the orientation of a vehicle such as an airplane. In aerospace engineering they are usually referred to as Euler angles. |
Save/Sending the Data
This raw data can then be sent over the network to the central application.
This will be the subject of another Lab Lesson
Visualizing Data
The tools, languages, and frameworks
Three.js
Three.js is a cross-browser JavaScript library and Application Programming Interface (API) used to create and display animated 3D computer graphics in a web browser. Three.js uses WebGL.
Processing
Processing is an open-source graphical library and integrated development environment (IDE) built for the electronic arts, new media art, and visual design communities with the purpose of teaching non-programmers the fundamentals of computer programming in a visual context.
Processing uses the Java language, with additional simplifications such as additional classes and aliased mathematical functions and operations. It also provides a graphical user interface for simplifying the compilation and execution stage.
The Processing language and IDE were the precursor to other projects including Arduino, Wiring and p5.js.
p5.js
In 2013, Lauren McCarthy created p5.js, a native JavaScript alternative to Processing.js that has the official support of the Processing Foundation.
Processing.py
Python Mode for Processing, or Processing.py is a Python interface to the underlying Java toolkit. It was chiefly developed by Jonathan Feinberg starting in 2010, with contributions from James Gilles and Ben Alkov
|
ThreeJS is a wrapper around the browser’s native WebGL API. It’s the de facto standard 3D library — there are others, like BabylonJS, but Three is just miles more popular. The native browser APIs are… painful to work with, you can think of ThreeJS kinda like a jQuery for in-browser 3D graphics. Doesn’t give you anything that’s not already there, it just wraps it all into a user-friendly API P5 is not a 3d graphics library, it’s an API for doing creative coding: things like procedural generation, natural simulations etc. It has some 3D features because it wraps the native WebGL API, but that’s not it’s core purpose. It is a artistic and teaching tool — it is occasionally used in production outside of artistic audio/visual stuff, but not often. It’s basically the JS version of Processing. |
Requirements
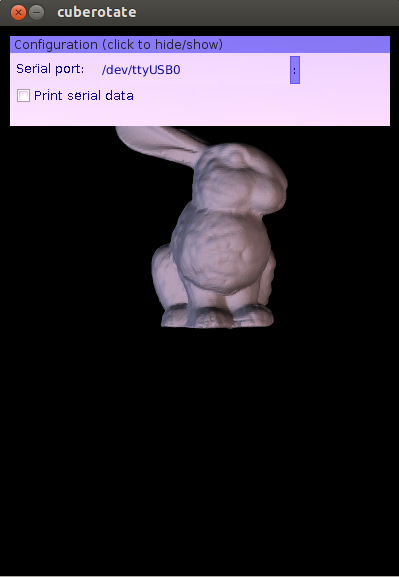
To visualize the data, we’ve put together a basic Processing sketch that loads a 3D model and renders it using the data generated by the AHRS sketch.
|
The OBJ library is required to load 3D models. It isn’t strictly necessary and you could also render a boring cube in Processing, but why play with cubes when you have rabbits?! |
Write the Processing Sketch
import processing.serial.*;
import java.awt.datatransfer.*;
import java.awt.Toolkit;
import processing.opengl.*;
import saito.objloader.*;
import g4p_controls.*;

float roll  = 0.0F;
float pitch = 0.0F;
float yaw   = 0.0F;
float temp  = 0.0F;
float alt   = 0.0F;

OBJModel model;

// Serial port state.
Serial       port;
String       buffer = "";
final String serialConfigFile = "serialconfig.txt";
boolean      printSerial = false;

// UI controls.
GPanel    configPanel;
GDropList serialList;
GLabel    serialLabel;
GCheckbox printSerialCheckbox;

void setup()
{
  size(400, 500, OPENGL);
  frameRate(30);
  model = new OBJModel(this);
  model.load("bunny.obj");
  model.scale(20);

  // Serial port setup.
  // Grab list of serial ports and choose one that was persisted earlier or default to the first port.
  int selectedPort = 0;
  String[] availablePorts = Serial.list();
  if (availablePorts == null) {
    println("ERROR: No serial ports available!");
    exit();
  }
  String[] serialConfig = loadStrings(serialConfigFile);
  if (serialConfig != null && serialConfig.length > 0) {
    String savedPort = serialConfig[0];
    // Check if saved port is in available ports.
    for (int i = 0; i < availablePorts.length; ++i) {
      if (availablePorts[i].equals(savedPort)) {
        selectedPort = i;
      }
    }
  }
  // Build serial config UI.
  configPanel = new GPanel(this, 10, 10, width-20, 90, "Configuration (click to hide/show)");
  serialLabel = new GLabel(this,  0, 20, 80, 25, "Serial port:");
  configPanel.addControl(serialLabel);
  serialList = new GDropList(this, 90, 20, 200, 200, 6);
  serialList.setItems(availablePorts, selectedPort);
  configPanel.addControl(serialList);
  printSerialCheckbox = new GCheckbox(this, 5, 50, 200, 20, "Print serial data");
  printSerialCheckbox.setSelected(printSerial);
  configPanel.addControl(printSerialCheckbox);
  // Set serial port.
  setSerialPort(serialList.getSelectedText());
}

void draw()
{
  background(0,0, 0);

  // Set a new co-ordinate space
  pushMatrix();

  // Simple 3 point lighting for dramatic effect.
  // Slightly red light in upper right, slightly blue light in upper left, and white light from behind.
  pointLight(255, 200, 200,  400, 400,  500);
  pointLight(200, 200, 255, -400, 400,  500);
  pointLight(255, 255, 255,    0,   0, -500);

  // Displace objects from 0,0
  translate(200, 350, 0);

  // Rotate shapes around the X/Y/Z axis (values in radians, 0..Pi*2)
  rotateX(radians(roll));
  rotateZ(radians(pitch));
  rotateY(radians(yaw));

  pushMatrix();
  noStroke();
  model.draw();
  popMatrix();
  popMatrix();
  //print("draw");
}

void serialEvent(Serial p)
{
  String incoming = p.readString();
  if (printSerial) {
    println(incoming);
  }

  if ((incoming.length() > 8))
  {
    String[] list = split(incoming, " ");
    if ( (list.length > 0) && (list[0].equals("Orientation:")) )
    {
      roll  = float(list[1]);
      pitch = float(list[2]);
      yaw   = float(list[3]);
      buffer = incoming;
    }
    if ( (list.length > 0) && (list[0].equals("Alt:")) )
    {
      alt  = float(list[1]);
      buffer = incoming;
    }
    if ( (list.length > 0) && (list[0].equals("Temp:")) )
    {
      temp  = float(list[1]);
      buffer = incoming;
    }
  }
}

// Set serial port to desired value.
void setSerialPort(String portName) {
  // Close the port if it's currently open.
  if (port != null) {
    port.stop();
  }
  try {
    // Open port.
    port = new Serial(this, portName, 115200);
    port.bufferUntil('\n');
    // Persist port in configuration.
    saveStrings(serialConfigFile, new String[] { portName });
  }
  catch (RuntimeException ex) {
    // Swallow error if port can't be opened, keep port closed.
    port = null;
  }
}

// UI event handlers

void handlePanelEvents(GPanel panel, GEvent event) {
  // Panel events, do nothing.
}

void handleDropListEvents(GDropList list, GEvent event) {
  // Drop list events, check if new serial port is selected.
  if (list == serialList) {
    setSerialPort(serialList.getSelectedText());
  }
}

void handleToggleControlEvents(GToggleControl checkbox, GEvent event) {
  // Checkbox toggle events, check if print events is toggled.
  if (checkbox == printSerialCheckbox) {
    printSerial = printSerialCheckbox.isSelected();
  }
}